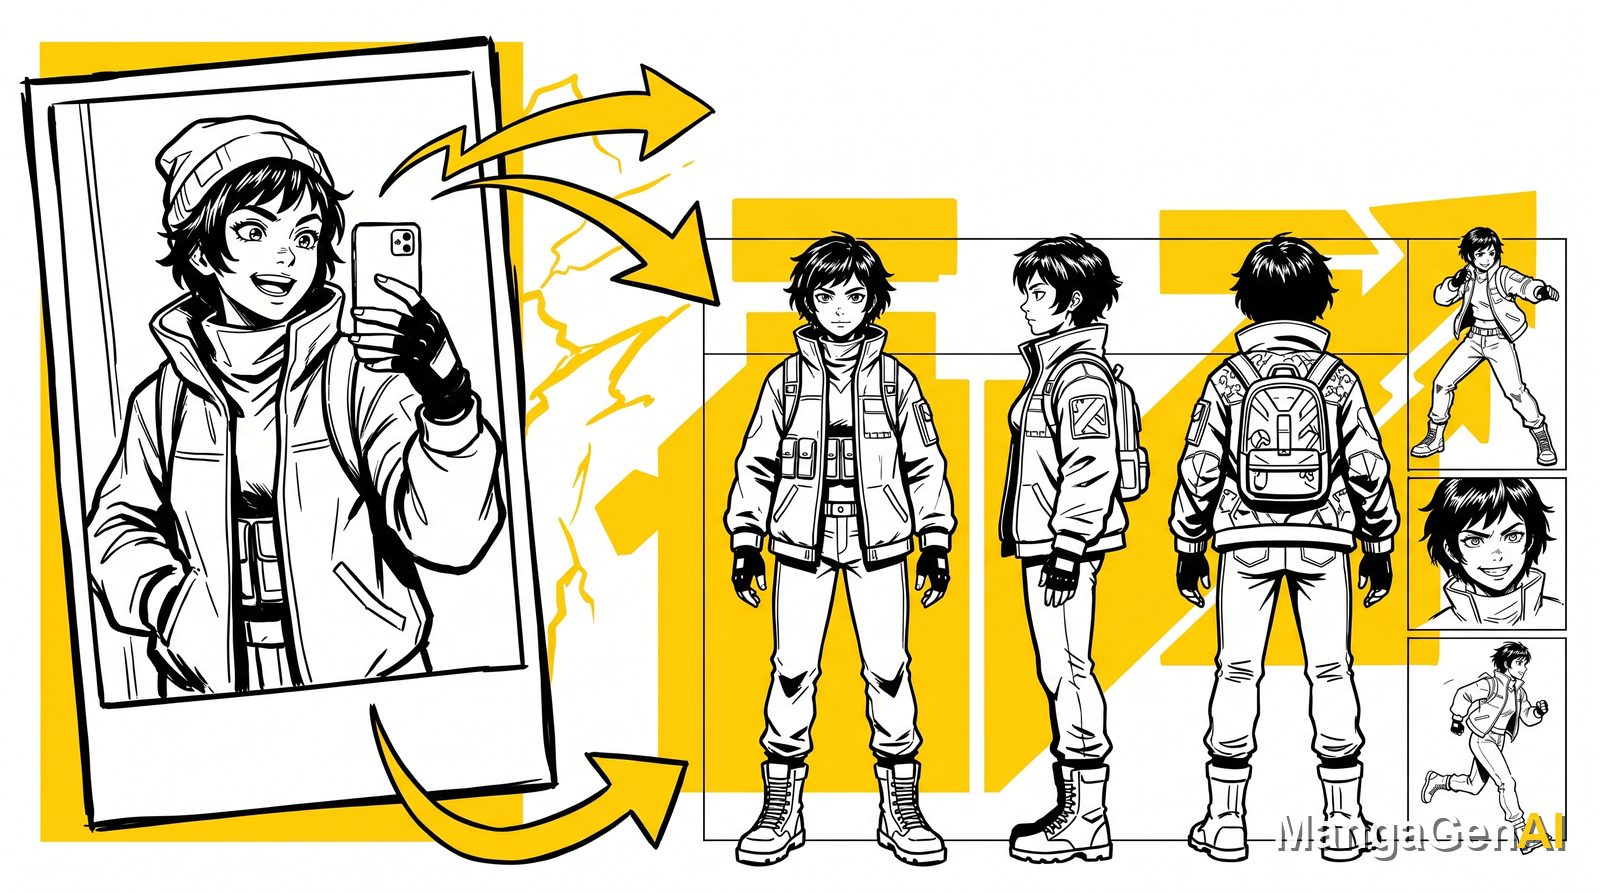
From a Single Selfie to a Full Character Sheet: The Complete Workflow
A lot of people who use AI to generate characters stop the moment they get one good-looking image. But if you want to run a virtual persona, create your own OC, or draw a comic with a recurring lead, one image is nowhere near enough. What you really need is a full character sheet: the same character shown from the front and side, in different expressions, in various poses, in several outfits, with every single image clearly looking like the same person.
That sounds like a ton of work, but MangaGenAI breaks it down into a clear production line. This article walks you from a single selfie all the way to a complete set of character designs, one step at a time. The point isn't how to press any one button, but how these features hand off to each other, and where each handoff happens.
First, the basics: what a character sheet is, and why you build it this way
A character sheet is essentially a character's ID card. It usually includes a finalized look, three views (front, side, and back), a few expressions, some signature poses, and one or two iconic outfits. Once you have this set, a character is truly established, and no matter what you do later (drawing comics, making stickers, or swapping scenes) you can keep it the same person throughout.
The keyword here is consistency. The thing AI gets wrong most often is that the same character's face drifts every single time you generate it. So the core idea of this workflow is to lock in the look first and save it, then start every later step from that saved version instead of rolling the dice all over again.
Step one: pin down the lead's face from a selfie
First, decide what this character looks like. The fastest starting point is one of your own selfies.
Use Photo to Manga: upload a clear, front-facing, single-person, well-lit photo, and pick the art style you want (modern and polished if you want a Japanese look, or a cute chibi two-head-tall style). What you get out of this step is a finalized portrait that keeps your features but is already a manga character.
If you'd rather not use a real face, you can skip the selfie and describe a brand-new character with text directly inside Character Scene. But the advantage of using a selfie is that the face now has a concrete reference, which makes consistency much more stable down the line.
This step needs to produce just one thing: a face you're happy with that will serve as the baseline for the whole character. Remember it, because it's the source for every step that follows.
Step two: turn the face into design sheets with Character Scene
Once you have a baseline face, head into Character Scene. This is where a single image gets upgraded into a full set of designs.
Choose the character design mode, use the image from step one as a reference, pair it with a description (hairstyle, outfit, personality, world setting), and generate each of the following:
- Standard three views: front, side, and back, which set the baseline for the character's look.
- Full-body art: to confirm overall proportions and the outfit.
- Bust close-up: to lock down the features and expression.
- Weapons and accessories: to finalize signature props on their own.
For proportions, you can pick a tall, realistic build or a cute chibi two-head-tall build. If you need a cutout, turn on background removal to output a transparent background, which makes compositing much easier later. Once these are done, you no longer have just a profile picture, you have a complete set of character design sheets.
Step three: save it to your asset library to lock in the look
This step is the easiest one to skip, yet it's the key to the whole workflow.
Save the finalized character to your asset library: give it a name (for example, Lead, Summer Outfit), write descriptive tags (the more specific the hair color, outfit, and accessories, the better), and attach the design images. From this moment on, the character is officially on the books.
After that, any tool that needs this character pulls the same entry from the asset library instead of describing it from scratch. That's your insurance for consistency: you're not relying on luck to get a similar result each time, you're starting from the same file every time.
Step four: strike a range of poses with Pose Master
A character sheet has to feel alive, and a standing pose alone isn't enough. Go into Pose Master, use the character's finalized design as the identity image, and switch up the poses while the face, hair, and outfit are all preserved.
There are dozens of built-in actions sorted into four categories (everyday, combat, charm, and interaction), so pick based on your character's personality: give a cool character a fighting stance or a stunning back view, and give a lively one a peace sign or a finger heart. If you need a precise angle, open the skeleton editor and adjust it by hand. Run a few of these, and your character sheet gains a whole dynamic side, with every image still clearly the same person.
Step five (optional): change outfits to extend the world
If you want to give your character more facets, you can head over to the photo side and extend the looks. Like a classical vibe? Try a Hanfu shoot. Prefer a Japanese feel? Go for a kimono shoot. Want a fantasy setting? Use a magic shoot. Dropping the character into different scenarios is basically expanding their wardrobe and their world.
This step is bonus points, not a requirement, but it's very useful for anyone running a character account: the same person in several styles means you're never short on material when it's time to post a batch.
Walking through a complete example
Let's say I want to create an original character named Lin.
- Run a selfie through Photo to Manga, pick the modern, polished style, and get a finalized face for Lin.
- Go into Character Scene, use that face plus a description (short black hair, a red hoodie, cheerful) and produce the three views, the full-body art, and a bust close-up.
- Save this set to the asset library, name it Lin, Base Outfit, and write clear descriptive tags.
- Go into Pose Master, call up Lin, and run three poses: running, a peace sign, and a glance over the shoulder.
- To extend things, use a kimono shoot to put Lin in a yukata for a summer version.
Once you finish this round, Lin goes from a single selfie to a full, reusable character sheet. Next time you want to draw Lin, make stickers, or start a comic, you just pull Lin out of the asset library.
A few tips to make the results more solid
- The selfie in step one sets the floor for everything. A clear, front-facing shot matters most, because if the face is blurry, every step afterward turns blurry too.
- The more specific your descriptive tags, the higher the consistency when you reuse the character across tools. Short hair is weaker than ear-length short black hair, parted on the right.
- For different outfits of the same character, save each as its own entry in the asset library. Don't mix them together, so you can call up exactly the look you need.
- Don't try to nail everything in one pass. Run the base outfit as your main line first and save it well, then circle back to add expressions, poses, and outfits. That's far easier than chasing a complete set right from the start.
Why it's worth this bit of effort
A pretty image is gone the moment you've looked at it; a stable character sheet is an asset you can produce content from again and again. Spend ten minutes putting your character on file, and in return you never have to wrestle with an uncooperative face every time you create something new. For anyone looking to build a character for the long haul, this workflow is what truly keeps the character alive.